Outdoor renovations often fail at the transition point, not in the main flooring area. Learning How to transition WPC flooring to a concrete patio requires more than selecting a matching trim. WPC means wood-plastic composite, a material that expands, contracts, and responds to sunlight. Concrete behaves differently. That difference creates movement, uneven edges, trapped water, and uncomfortable height changes.
Industry research supports careful planning. Grand View Research’s 2024 Wood Plastic Composites Market report identifies construction as a major application sector, reflecting growing interest in composite surfaces. The Freedonia Group’s decking industry research also highlights durability, low maintenance, and outdoor performance as important purchasing factors. These reports describe market direction, not installation guarantees. Manufacturer instructions remain the controlling technical reference.
Measure twice.
A reliable transition begins with the existing slab. Check its slope, cracks, surface height, drainage path, and moisture condition. A straightedge can reveal small dips that later become visible gaps. WPC boards should not sit directly on wet concrete unless the system specifically permits it. Use compatible sleepers, clips, spacers, or transition profiles recommended by the manufacturer. Allow movement at walls and fixed edges. Keep drainage channels open. Do not hide water problems beneath attractive boards.
This guide examines practical transition methods, including flush edges, raised frames, ramps, and threshold details. It also considers accessibility, slip resistance, fastener compatibility, and long-term maintenance. Real patios are rarely perfect. That is the uncomfortable part. A beautiful transition may still need adjustment after one hot summer. Good workmanship accepts that possibility and plans for inspection, drainage, and repair.
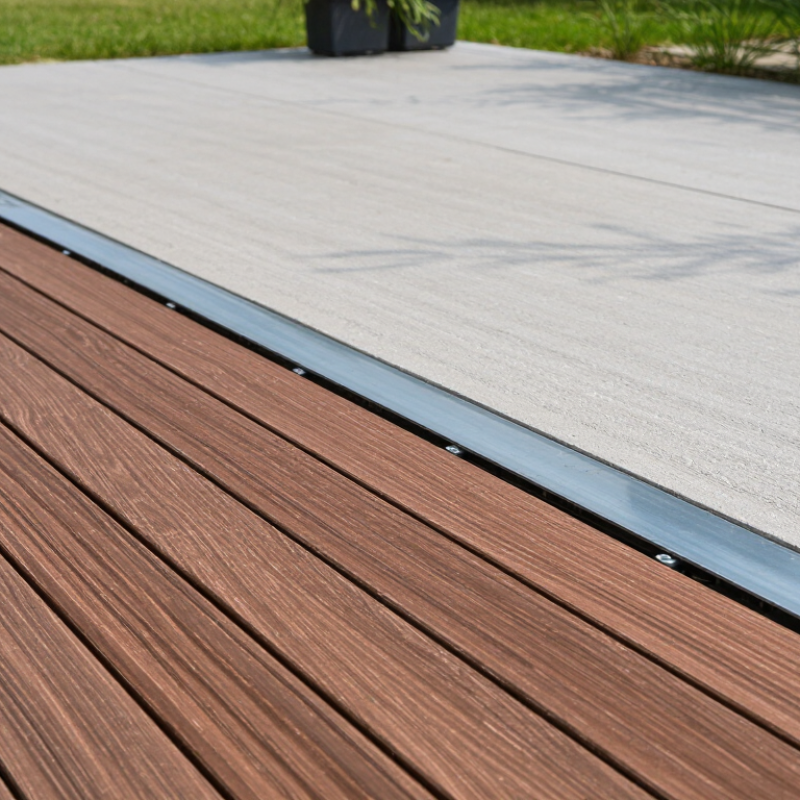
Before planning a WPC flooring transition, inspect both surfaces in daylight. I check the floor for loose boards, swollen edges, stains, and damaged clips. A dull, uneven sound may indicate movement below the WPC. Press several boards near walls and doorways. They should feel firm, not springy. Moisture deserves attention. Dark marks, soft spots, or a musty smell can signal trapped water. I once overlooked a small wet area beside a drain, and the repair became much larger.
The concrete patio must also be stable and dry. Check its slope with a long level and a straightedge. Water should move away from the building, not collect at the transition. Record cracks, high points, low areas, and crumbling edges. Hairline cracks may remain harmless, but widening cracks need professional evaluation. Tap suspicious sections with a metal tool. Hollow sounds can suggest separation beneath the slab. Do not assume a clean-looking patio is structurally sound.
Measure the height from the existing WPC surface to the concrete at several points. These measurements reveal whether a threshold, support system, or gradual transition is practical. Inspect the doorway, drainage path, and nearby wall before choosing the final level. A small height error can create standing water or a tripping edge. Leave expansion space. WPC materials still move with temperature changes. The assessment may feel overly cautious, but skipping it often causes preventable movement, moisture, and alignment problems.
Transitioning WPC flooring to a concrete patio begins with a measured layout. Mark the doorway, patio edge, and expected walking line before cutting boards. Keep the WPC surface slightly above the concrete, but avoid creating a toe-catching lip. A difference near 6 mm is usually easier to manage with a tapered transition strip. Larger differences need a properly supported ramp, not stacked scraps.
Drainage controls the entire transition. A 2% slope drops 20 mm over one metre. The 2024 International Residential Code uses approximately 2% as a landing-slope benchmark, while the U.S. Access Board’s ADA Standards specify a 1:48 maximum cross slope for accessible routes. These figures are useful checks, though local requirements may differ. Confirm the concrete falls away from the building, then use a laser level at both surfaces. Water must not collect beneath the WPC edge.
Leave movement space according to the flooring manufacturer’s technical sheet. WPC boards expand with heat and moisture. ASTM D7031 identifies dimensional stability as a key evaluation factor for wood-plastic lumber. I would not guess the gap from appearance alone. Sweep the concrete clean, repair cracks, and test-fit several boards first. My own layout preference is conservative: fewer joints, a straight sightline, and a transition that can be inspected later. Tiny errors show quickly.
| Planning Dimension | Recommended Value or Range | How to Apply It | Reason for the Requirement |
|---|---|---|---|
| Finished-floor reference | Measure from the top of the interior finished floor to the top of the concrete patio. | Use a laser level or a long spirit level before ordering trims or transition profiles. | The transition must be designed from the final surface levels, not from the subfloor or rough slab. |
| Concrete patio fall | Approximately 1/8 to 1/4 inch per foot (about 1% to 2%). | Slope the patio away from the building, while keeping the WPC walking surface stable and fully supported. | A positive outward fall helps direct rainwater away from walls, thresholds, and door openings. |
| Slope over a 10-foot patio | About 1-1/4 to 2-1/2 inches of total fall. | Confirm the high and low points with a laser level before fixing sleepers, pedestals, or support rails. | This converts the percentage slope into a practical layout measurement for installation. |
| WPC expansion allowance | Follow the flooring specification; a common planning allowance is about 1/8 to 1/4 inch at fixed edges. | Leave the allowance at walls, door frames, posts, and transition restraints. Use the larger gap when temperature variation is substantial. | Composite materials can expand and contract with temperature changes and need room to move. |
| Low height difference: 0 to 1/4 inch | Use a slim reducer, edge trim, or flush transition detail. | Keep the transition firmly supported and avoid creating a sharp exposed edge. | A small difference can usually be covered without a pronounced ramp, provided drainage is maintained. |
| Moderate height difference: 1/4 to 3/4 inch | Use a beveled reducer or a tapered transition ramp. | Provide continuous support beneath the ramp and make the bevel face the direction of travel. | A bevel reduces the trip risk created by a raised WPC edge beside the concrete surface. |
| Large height difference: more than 3/4 inch | Correct the substrate or build a properly supported ramp; do not rely only on a thin surface trim. | Check door clearance, drainage, edge stability, and accessibility before installation. | A large unsupported transition can flex, retain water, or become a significant trip hazard. |
| Door threshold relationship | Keep the exterior surface below the interior threshold and preserve the door’s drainage path. | Verify the finished WPC height, underlayment or support height, and transition trim before cutting the first board. | The threshold must continue to shed water outward rather than directing water into the building. |
| Concrete condition | The slab should be sound, clean, and free of standing water, loose material, and active movement. | Repair cracks or spalled areas and remove contaminants before installing supports or adhesive components. | A damaged or contaminated base can prevent reliable support and cause movement at the transition. |
| Support and drainage below WPC | Use a manufacturer-approved support method and maintain open drainage paths. | Do not block weep paths or create isolated low spots at the concrete-to-WPC boundary. | Water trapped beneath composite flooring can contribute to staining, mold growth, and premature deterioration. |
| Final verification | Check level difference, slope direction, transition width, fasteners, and door operation. | Walk the route after dry-fitting the transition and inspect it from both sides before permanent fixing. | A dry fit reveals trip points, binding doors, insufficient expansion space, and poor water flow early. |
Note: Dimensions are planning guidance. Always verify the flooring, transition, door, drainage, and local building requirements for the specific installation.
Before cutting WPC flooring, collect a straightedge, tape measure, spacers, stainless-steel fasteners, a moisture meter, backer rod, and exterior-grade sealant. Add a compatible transition strip, even if the joint looks narrow. Small gaps become obvious after temperature changes.
Grand View Research valued the global wood-plastic composites market at about 7.13 billion dollars in 2023. Its report also projected a 7.4% annual growth rate through 2030, increasing the need for careful mixed-surface installation.
Clean the concrete edge thoroughly. Remove dust, weak cement, oil, and loose paint with a stiff brush and suitable cleaner. Let the surface dry completely. Do not seal a damp joint.
The American Concrete Institute commonly uses a 1:48 slope for exterior paving, or about 6 millimeters per 300 millimeters, to guide water away. Check the patio with a level before fixing the WPC. A flat-looking slab may still hold water beside the transition.
Leave a movement gap according to the flooring manufacturer’s installation data. Place backer rod inside deeper joints, then apply sealant without filling the entire cavity. The sealant should remain flexible while the WPC expands and contracts.
Keep the transition strip supported, not suspended over a hollow edge.
I once underestimated this detail. It created a slight bounce near the doorway. A firmer support would have prevented it.
Do not rush this joint.
Transitioning WPC flooring to a concrete patio demands a clean, controlled edge. Measure the doorway and mark the finished floor height before cutting. The transition strip should bridge both surfaces without pressing against the planks. Leave the expansion space required by the flooring instructions, often about 6–10 mm. Check the exact requirement.
Place the strip over the joint, then fasten it to the concrete rather than the floating floor. Predrill masonry holes to prevent cracking. Use corrosion-resistant screws or a compatible construction adhesive rated for exterior moisture. Keep fasteners evenly spaced, with tighter spacing near active walkways. A loose strip becomes a trip hazard quickly. It happens.
Secure the flooring edges with the recommended edge profile, but do not clamp the planks tightly. WPC can expand and contract with temperature changes, especially beside sun-heated concrete. ASTM F2170 testing measures concrete’s internal relative humidity; it does not replace the flooring manufacturer’s moisture limit. Test the slab before installation, and confirm drainage prevents standing water at the threshold. Industry installation guidance commonly warns against sealing drainage paths. That detail is easy to miss.
In practice, I dry-fit the strip, walk across it, and inspect the joint from both sides. A 2–3 mm height mismatch may look minor but can catch shoes and wheels. Recheck alignment after the adhesive begins setting. My earlier mistake was trusting a perfectly straight wall; patios rarely are. Adjust the strip to the actual slab, not the drawing.
A clean transition starts with a careful inspection. Check that the WPC flooring ends evenly against the concrete patio. Look for raised edges, loose fasteners, cracks, and standing water. The concrete should slope away from the building. Even a small low spot can trap rain beside the flooring.
Allow both surfaces to dry fully before sealing. Remove dust from the joint with a soft brush, then use an exterior sealant suitable for WPC and concrete. Leave room for natural movement. Do not fill an expansion joint rigidly. I once sealed a similar edge too early, and trapped moisture caused dark staining beneath the joint. That mistake was avoidable. Follow the sealant manufacturer’s curing time, even when the surface feels dry.
Inspect the transition after heavy rain and during seasonal temperature changes. Watch for peeling sealant, widening gaps, soft areas, or water collecting near the edge. Clean leaves and soil before they hold moisture against the joint. Use mild soap and a non-abrasive brush. Avoid pressure that could force water beneath the flooring. Recheck the fasteners every few months. A slightly uneven edge may need adjustment, not extra sealant. Keep records of repairs and weather conditions. Small notes help reveal recurring drainage problems.
Mark the doorway, patio edge, and walking line before cutting boards. Use a laser level on both surfaces. Keep the WPC slightly higher than the concrete, but avoid a raised lip.
A difference near 6 millimeters often works with a tapered transition strip. Larger differences need a supported ramp. Do not stack leftover scraps.
A slope near 2% usually helps water move away from the building. This means about 20 millimeters over one metre. Local rules may differ.
Water must not collect beneath the WPC edge. Check for low spots after rain. A flat-looking slab can still hold water beside the doorway.
Prepare spacers, a straightedge, tape measure, stainless-steel fasteners, and a moisture meter. Add backer rod and flexible exterior sealant. Keep a compatible transition strip nearby.
Remove dust, oil, loose paint, and weak cement with a stiff brush. Repair cracks. Let the concrete dry completely before sealing.
Follow the flooring installation data for the required gap. WPC expands with heat and moisture. Use backer rod in deeper joints, then apply flexible sealant.
Do not seal a damp joint or fill an expansion gap rigidly. Do not leave the transition strip unsupported. I once underestimated support, and the edge bounced slightly.
Look for raised edges, loose fasteners, cracks, peeling sealant, and standing water. Inspect after heavy rain and seasonal temperature changes. Remove leaves and soil regularly.
Check the fasteners and underlying support before adding sealant. A small adjustment may solve the problem. More sealant is not always better.
How to transition WPC flooring to a concrete patio begins with carefully assessing both surfaces. Check the WPC boards for movement, moisture damage, or uneven edges, and inspect the concrete patio for cracks, low spots, drainage problems, and height differences. Next, plan the transition layout so the joint looks balanced and remains safe to walk across. Measure the slope and elevation, allowing water to flow away from the flooring while avoiding an abrupt step.
Prepare the joint by cleaning the concrete, trimming the WPC flooring neatly, and gathering a suitable transition strip, fasteners, spacers, sealant, and basic installation tools. Secure the flooring edges firmly without restricting normal expansion and contraction. Install the transition strip evenly along the joint, then seal exposed gaps to help prevent moisture and debris from entering. Finally, inspect the finished connection for stability, smoothness, drainage, and a consistent appearance. Regular cleaning and periodic checks will help preserve the patio transition over time.

KandS Floor