How to Repair Scratches on Co-Extruded WPC Surfaces?

Time:2026-05-09 Author:Isabella
0%

Co-extruded wood-plastic composites (WPC) are popular for their durability and aesthetic appeal. However, scratches can detract from their appearance. According to a report by the Plastics Industry Association, nearly 70% of consumers consider the exterior condition of their deck or patio essential. This makes understanding how to fix scratches on co-extruded WPC surfaces critical.

Industry expert Dr. Emily Carter, a leading researcher in composite materials, states, “Repairing surface damage requires both skill and the right materials.” Her insights highlight the importance of using appropriate repair techniques to maintain the surface integrity of WPC products. These repairs can enhance the longevity and visual appeal of decks and outdoor furniture.

Though many resources detail various repair methods, the effectiveness often depends on the severity of the scratch. Some minor scratches may require simple DIY solutions, while deeper ones might need professional attention. Balancing cost-effectiveness and material choice is essential. Yet, not all repairs achieve the desired results, leading to frustration and the need for reflection on the repair process. Understanding how to fix scratches on co-extruded WPC surfaces can help homeowners maintain the beauty and functionality of their outdoor spaces.

How to Repair Scratches on Co-Extruded WPC Surfaces?

Understanding Co-Extruded WPC Surfaces and Common Scratches

Co-extruded Wood-Plastic Composites (WPC) are becoming widely recognized for their durability and aesthetic appeal. These surfaces combine wood fibers with plastic, creating a robust material suitable for outdoor use. However, like any surface, they can develop scratches over time. Common causes include furniture movement, pets, or even environmental factors.

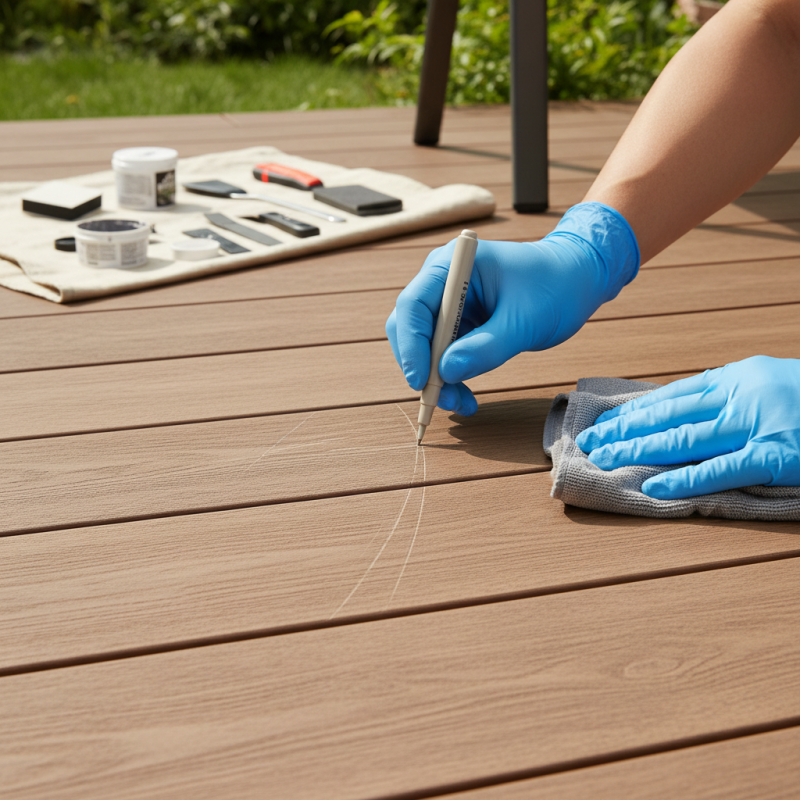
Addressing these scratches requires an understanding of the material's structure. The outer layer often protects the core, but deeper scratches can penetrate this barrier. If the scratch is superficial, utilizing a mild abrasive can help. A soft cloth and gentle rubbing often improve the appearance. For deeper scratches, a color-matching filler may be necessary. Ensuring that the repair blends with the surrounding surface is vital.

Repairing scratches on co-extruded WPC can be a bit of a challenge. Experimenting with different tools and techniques might lead to unexpected results. Sometimes, a repair may not look perfect. That's okay; imperfections can add character. Reflecting on these minor flaws might help in understanding the material better and planning future maintenance.

How to Repair Scratches on Co-Extruded WPC Surfaces?

Repair Method Effectiveness Time Required Cost Tools Needed
Heat Gun Method High 5-10 minutes Low Heat gun, scraper
Color Wax Filling Medium 15-20 minutes Moderate Color wax, cloth
Epoxy Repair Kit High 30-60 minutes High Epoxy kit, mixing stick
Sanding and Staining Medium 20-30 minutes Moderate Sander, stain, brush
Replacement Panel Very High 1-2 hours Very High Screws, screwdriver

Tools and Materials Needed for Scratch Repair on WPC

When dealing with scratches on co-extruded WPC surfaces, gathering the right tools and materials is crucial. Start with a clean cloth or rag to wipe down the surface. You will also need a mild detergent and water for cleaning. For light scratches, fine sandpaper (around 200-400 grit) is effective. A utility knife can help to gently smooth down rough edges. A heat gun or hairdryer can aid in softening the material during repair.

Consider using a WPC-compatible repair kit, which often includes filler and color-matching compounds. These kits can restore the surface's appearance. A putty knife is essential for applying filler evenly. If deeper scratches exist, you may want to keep a small brush handy for detailing. While the repair process can be effective, results may vary based on the scratch depth and surface texture. Reflect on your skills and take your time for the best outcome.

Step-by-Step Guide to Assessing the Damage on the Surface

Assessing scratches on co-extruded WPC surfaces can be a straightforward process if approached methodically. Start by cleaning the area around the scratch with mild soap and water. This removes dirt and grime that can obscure damage. Use a soft cloth to avoid adding more scratches. Once it's clean, take a close look. Is the scratch deep or just superficial? This determines the repair method.

For deeper scratches, you may need to consider more intensive repairs. Sandpaper can be effective but be cautious; you want to taper the edges of the scratch without creating new marks. If the scratch feels rough after sanding, use finer grit paper to smooth it out. Occasionally, the color of the WPC may fade. In such cases, applying a matching touch-up dye may restore its original appearance. It's essential to test this on a small area first. This method elevates results but requires careful attention to detail.

Techniques for Filling and Blending Scratches on WPC

When dealing with scratches on co-extruded Wood Plastic Composite (WPC) surfaces, effective repair techniques are essential. Co-extruded WPC often combines polymers and wood fibers, producing a durable product. However, its susceptibility to scratches can compromise its aesthetic appeal. Reports indicate that over 50% of WPC users experience some form of surface wear within the first two years.

To fill scratches, one recommended method is using a color-matched filler. These fillers blend seamlessly with the WPC surface while providing adequate adhesion. The application process involves cleaning the area and applying the filler with a putty knife. It's essential to smooth the surface and allow it to cure completely. This method not only hides scratches but also reinforces the integrity of the composite.

Tip: Always test any filler on a small area first to ensure proper color matching and adhesion.

Another technique involves heat treatment. Gently heating the scratched area allows the WPC to slightly melt, which can help minimize the visibility of scratches. Care is needed, as excessive heat can lead to further damage. Industry data suggest that heat treatment can reduce visible scratches by up to 70% when done correctly.

Tip: Use a heat gun at the lowest setting and keep it moving to avoid overheating the material.

While these methods can significantly improve the appearance of scratched WPC surfaces, results may vary. Understanding the material's limitations can guide appropriate repair choices.

Repair Techniques for Scratches on Co-Extruded WPC Surfaces

Finishing Touches for a Seamless Repair on Co-Extruded Surfaces

Repairing scratches on co-extruded WPC surfaces requires careful attention to detail. Start by cleaning the scratched area thoroughly. Use a soft cloth and mild soap to remove dirt. Dry the surface completely before you begin the repair process. It’s crucial to ensure the surface is void of moisture that could interfere with adhesion.

To fill in the scratches, consider using a matching WPC repair compound. Apply the compound with a fine putty knife. Press the compound into the scratch and remove excess material. Smooth it out for an even finish. This step feels simple, yet it demands precision. Oversmoothing can lead to more visible imperfections, making the repair stand out.

After the compound cures, sand the area lightly to blend it with the surrounding surface. Use fine-grit sandpaper for a seamless appearance. However, be cautious. Sanding too aggressively may create more scratches. If the finish doesn’t perfectly match, you might need to stain or paint the area. This process may require some trial and error. Achieving a flawless outcome is not always easy, but with patience, it’s possible to restore the beauty of co-extruded WPC.

FAQS

: What tools do I need for repairing scratches on WPC surfaces?

: You need a clean cloth, mild detergent, water, fine sandpaper, and a utility knife.

How can I fill light scratches on WPC surfaces?

Use a color-matched filler applied with a putty knife for best results.

Is heat treatment effective for scratch repair?

Yes, gentle heating can reduce scratch visibility by up to 70%. Caution is key.

How do I apply filler to scratches?

Clean the area first and then use a putty knife to apply the filler evenly.

Should I test the filler before full application?

Yes, always test on a small area to check color matching and adhesion.

Can I use just any heat source for warming up scratches?

No, use a heat gun on low to avoid overheating and potential damage.

How long should I allow filler to cure?

Allow the filler to cure completely for the best adhesion and finish.

Will all scratches repair equally?

No, repair results can vary based on scratch depth and surface texture.

What should I avoid when repairing WPC?

Avoid excessive heat and rushing through the repair for better results.

How often do users experience scratches on WPC?

Reports suggest over 50% of users notice surface wear within the first two years.

Conclusion

In the article "How to Repair Scratches on Co-Extruded WPC Surfaces," readers are guided through understanding co-extruded wood-plastic composite (WPC) surfaces and the common types of scratches they may encounter. The piece outlines essential tools and materials necessary for effective scratch repair, providing a comprehensive, step-by-step guide on how to assess the damage on these surfaces.

Moreover, it explores various techniques for filling and blending scratches seamlessly, ensuring a uniform appearance post-repair. The final section offers finishing touches that help achieve a flawless restoration on co-extruded surfaces. This informative resource serves as a practical guide for anyone looking to learn how to fix scratches on co-extruded WPC surfaces, promoting a more sustainable approach to maintaining outdoor and indoor applications of WPC materials.

Isabella

Isabella

Isabella is a dedicated marketing professional with a sharp focus on driving brand growth and engagement through strategic content creation. With an extensive background in digital marketing, she combines her passion for storytelling with her keen understanding of industry trends to deliver......